
This is Part 2/2 of a breakdown on my project Nissa Revane: Planeswalker. You can read Part 1 here. Check out the project on ArtStation here.
Right around the time that I was completing the high poly model for Nissa Revane, the developer release of Unreal Engine 5 became available for download from Epic Games. I actually hadn’t been paying close attention until I started seeing all the talk on social media and manic articles starting with titles like “THE END OF LOW POLY?”. Then I started to really tune in.
With every new technological advancement in 3D, it’s important to take a deep breath. While nanite and lumen promise incredible leaps in realism and potential for game developers, they don’t spell the demise of high poly to low poly pipelines and baking techniques. These tools are so well developed it just doesn’t make sense to drop them. And best practices for animation remain the same: clean, consistent loops that can be easily deformed are still crucial. In any case, nanite is does not support deforming meshes: its key usage is in backgrounds.
With all this in mind, I decided to look at a “mid-poly” approach for retopologizing Nissa. Why not push it since she is a next generation character anyway?
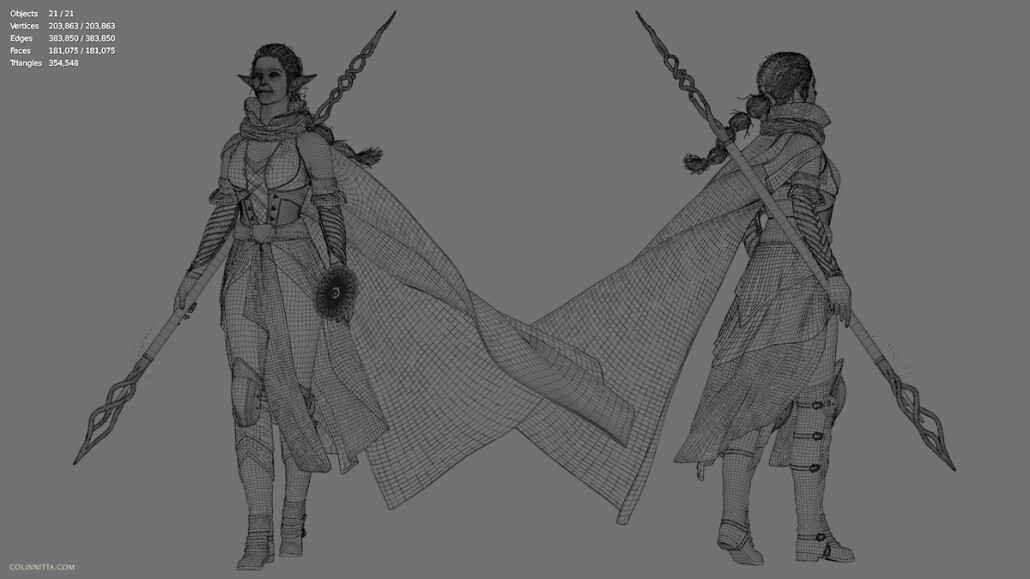
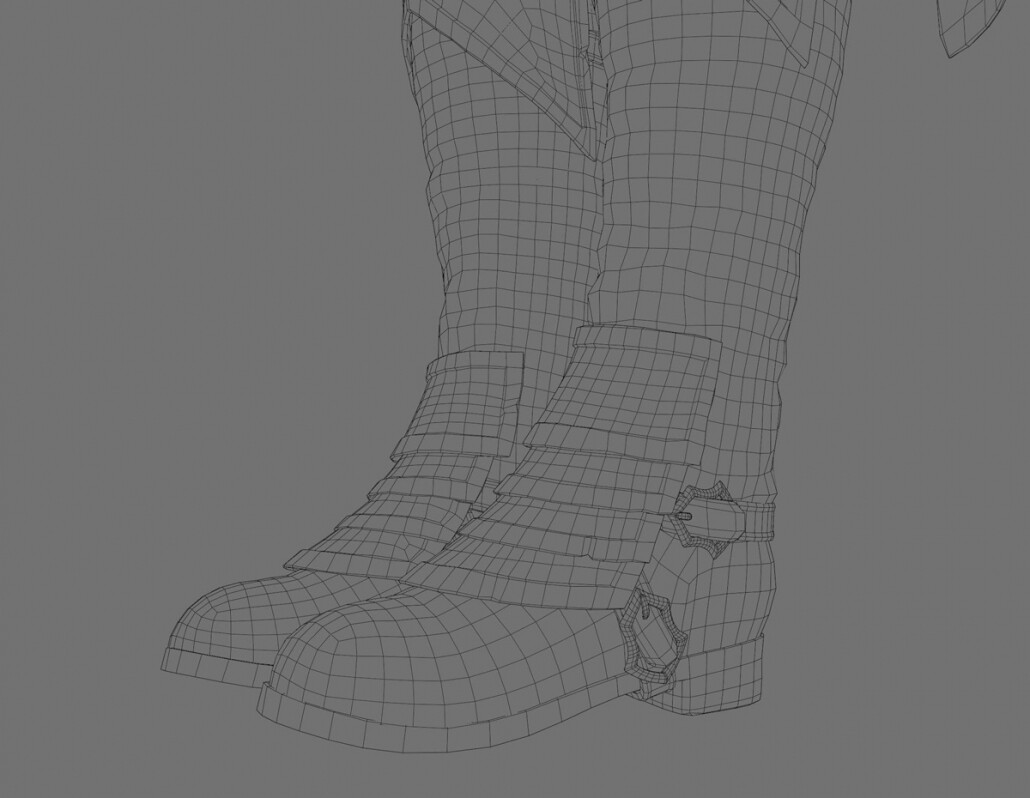
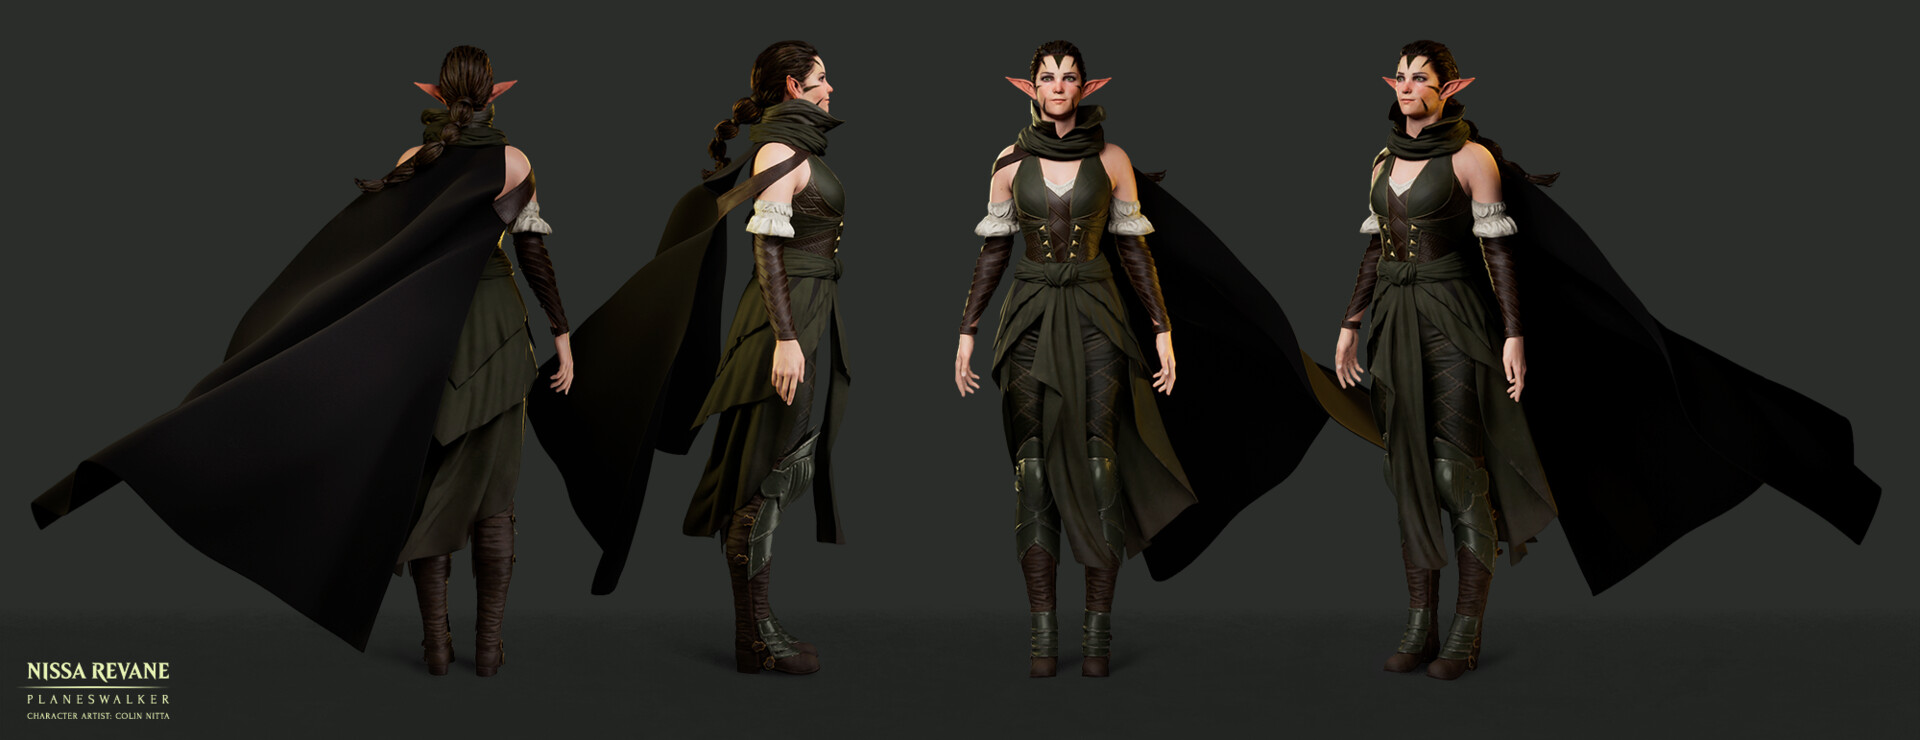
Having labored under lower poly count considerations before, retopologizing Nissa felt like abundant luxury at times. I didn’t count triangles but instead focused on overall silhouette. With the boots I kept the lobster plates as separate meshes so the shadows cast by them would distinctly show the change in the surface. Yes, I totally could have merged them together with the boot and relied on a normal map for optimization purposes. But they just wouldn’t look as good up close. It was these up close shots that I wanted the details to really shine!
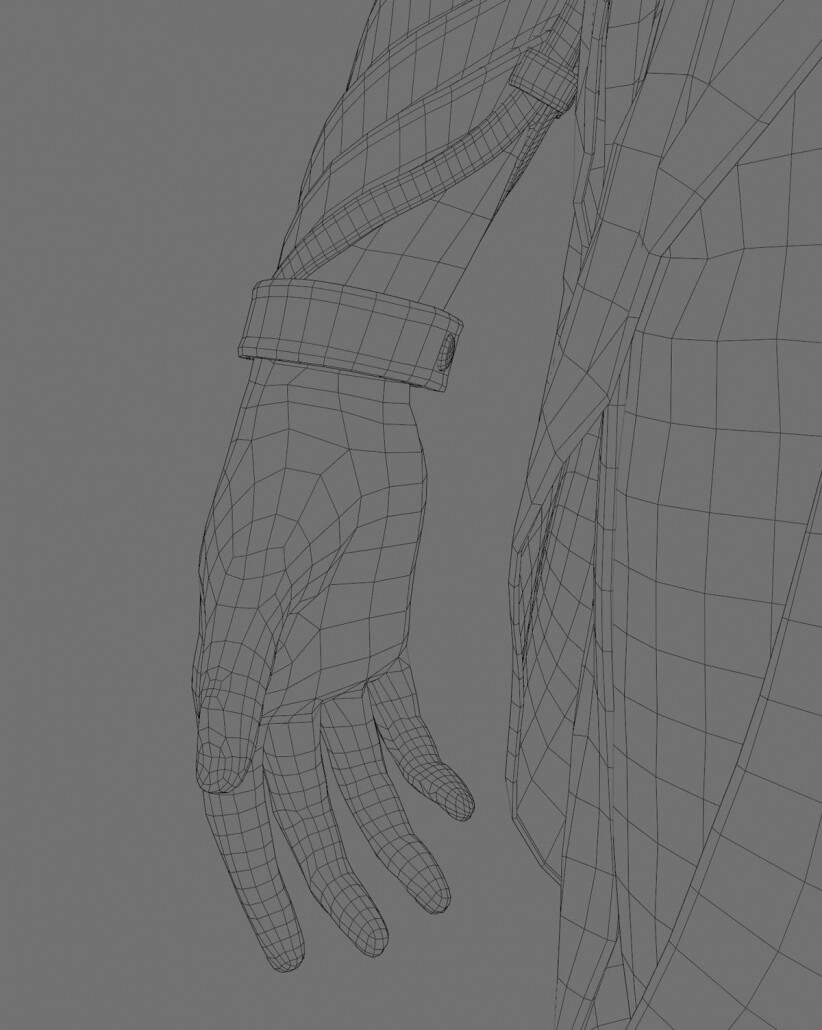
I was a little worried about the characters wrap-around leather sleeves. The sleeve straps follow a sharp 60 degree angle that goes against the natural loops of the arm. I thought a lot about whether I should optimize the straps and the arm into a single mesh with horizontal loops, but in the end decided against it. They still have clean quads so they should be able to deform with the bend of the arm. Later, when posing in ZBrush I found this to be the case. They worked out fine, with some of them compressing together in the innermost joints. But an actual leather wrap would do that in real life too, squishing and stretching, so I found the results to be pretty much lifelike.
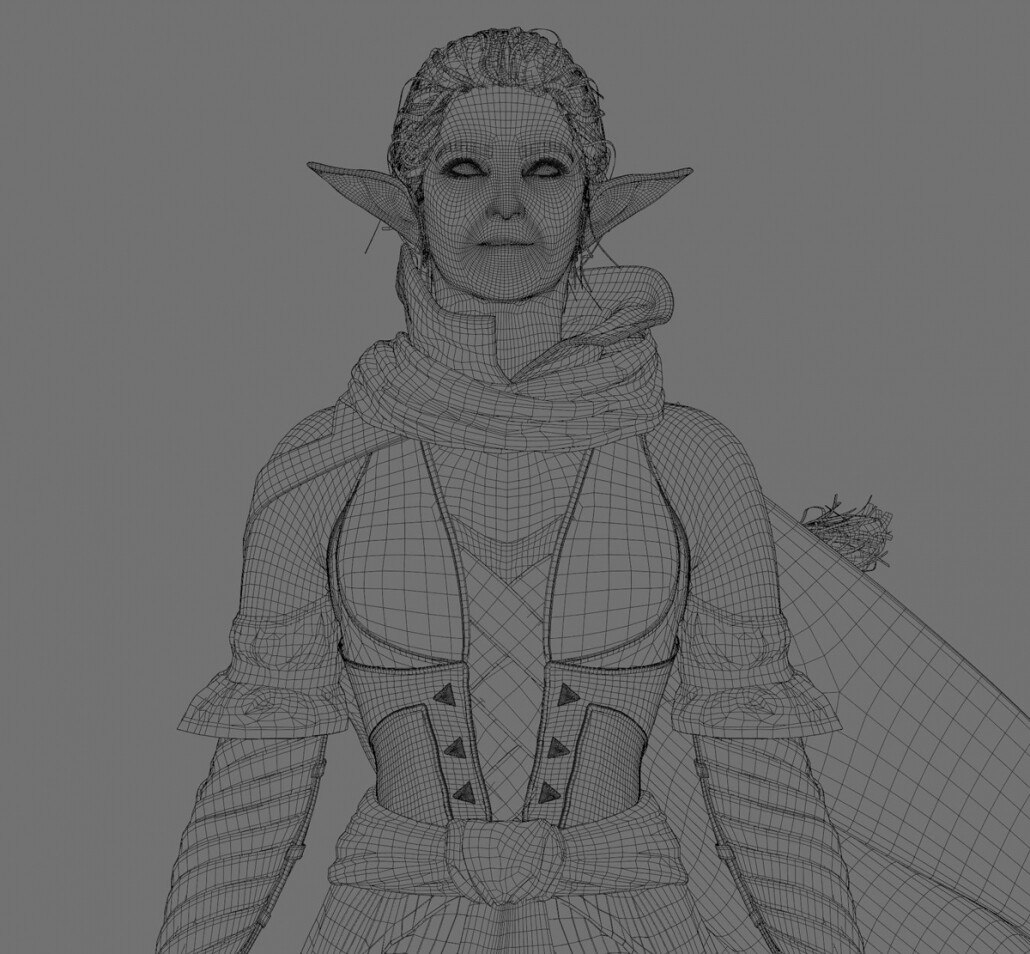
To be honest, it was a relief to be able to work in this manner. Just by focusing on overall silhouette and capturing the details I wanted made the retopology process feel much more enjoyable than it has in the past. Like many others, I’ve run into the wall of focusing on a beautiful high poly model that is very difficult to translate into low poly. As the artist, you can start to fight yourself and it can be really frustrating. What’s important here is intention. Nissa is intended to be a next-gen character and we still don’t really know what’s possible. No games have been developed in UE5… yet. I’m learning and experimenting along with everyone else so I just wanted to reach a little higher – just a bit – and see what I could come up with!
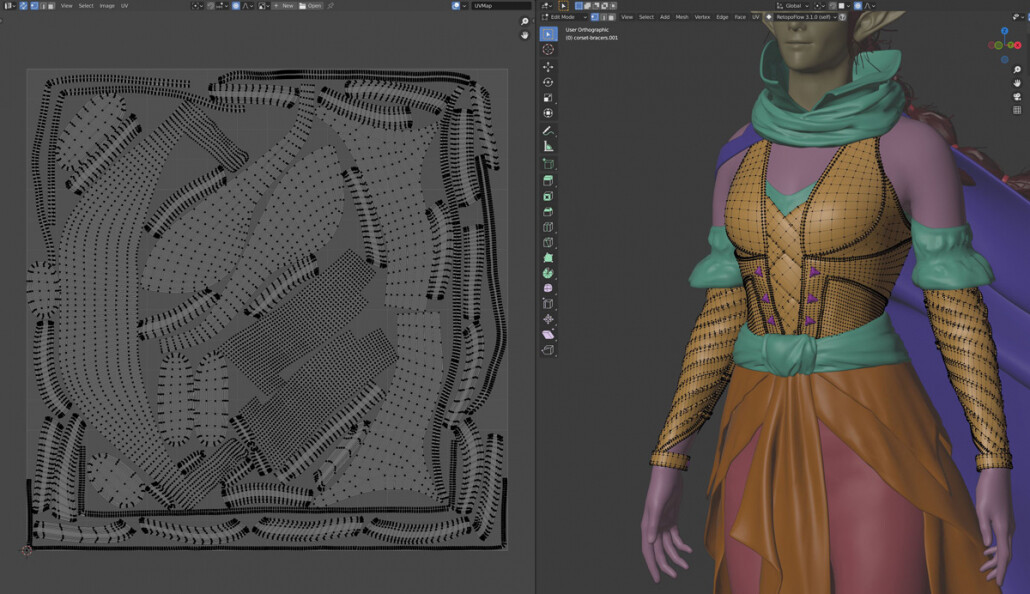
My UV process was straightforward. I assign materials to my texture sets and give them each a different viewport color in Blender so I can keep everything organized. As always, I make seams on the back side side of meshes as much possible (or in actual seams, as in the case of clothing) and group textures together by proximity and/or material, depending on what works best.
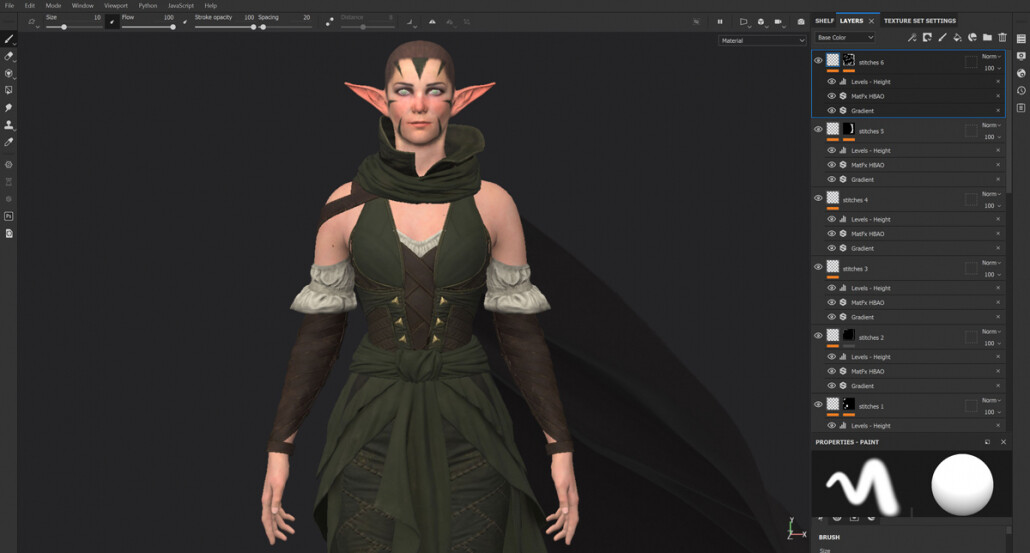
Finally, texture painting! When I first started working in 3D, I had a lot of doubts about whether this industry was right for me. But when I first started using Substance Painter, it all changed for me. I’ve been painting with traditional media since I was in high school and have been digitally painting since 2017, so the process just felt like home. I love watching the model get life breathed into it once normals are baked and color starts getting laid down. There’s nothing like it
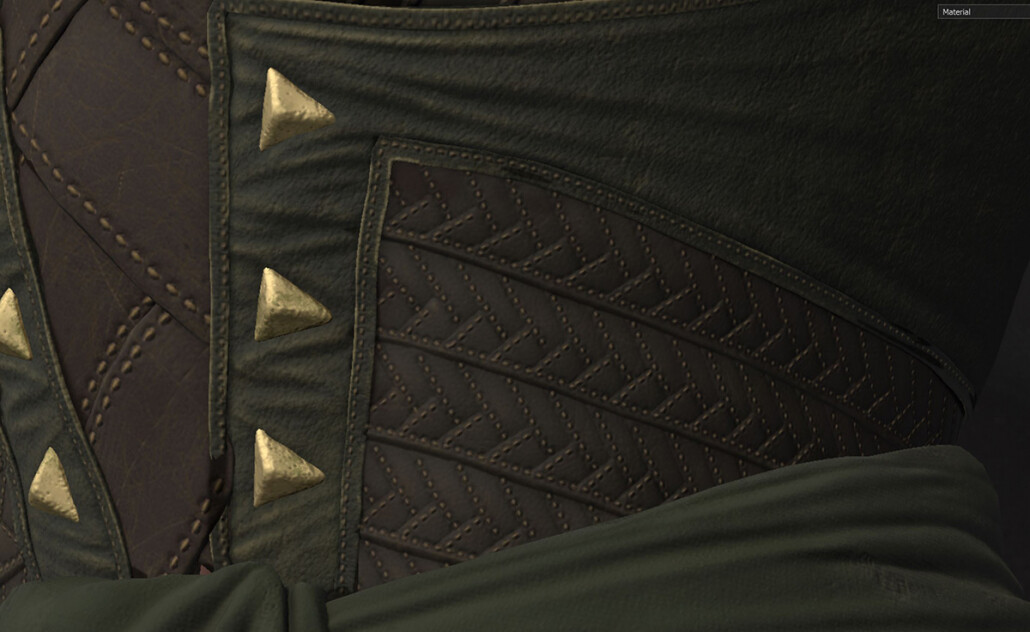
One of the reasons I left these tiny overlapping straps devoid of manual detail in ZBrush is because I knew they’d get a lot more love in Substance Painter. I used a technique for stitches developed by Safwen Laabidi that allows for painting them on directly, complete with normal, basecolor and AO details. I was first introduced to this method via Ackeem Durant’s character course at The Vertex School. Such a great way to work and really fun too.
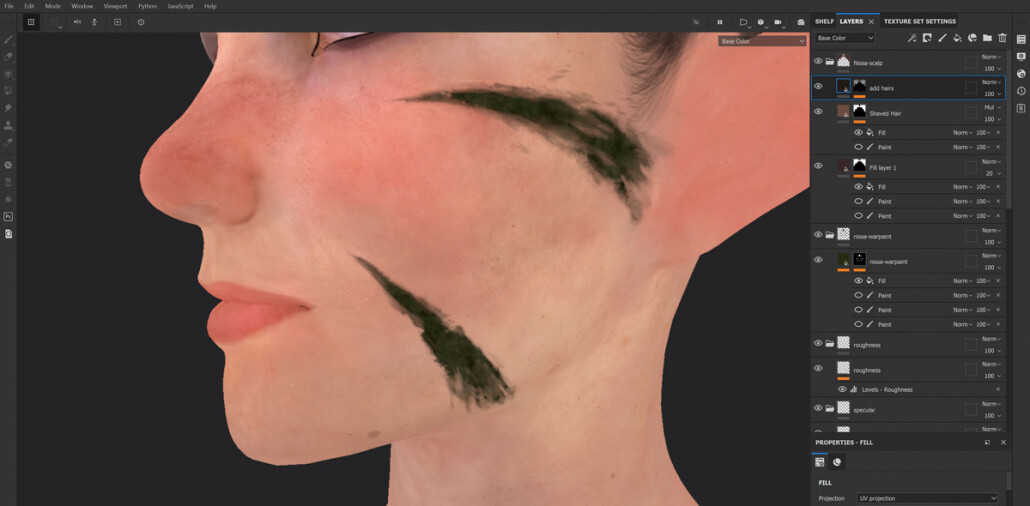
Here is the base color channel for the face. I started with a cross-polarized photograph of my wife’s face and quickly projected it on the low poly model in Mari. I then brought it over in Substance Painter and layer up organic details until I have something that feels right. Overall, I wanted a natural feel that felt in tune with the character. I especially enjoyed painting Nissa’s warpaint. I imagined her streaking on these marks on her face preparing for battle, and over the day, her sweat streaks into them, causing them to become a bit grimy. Ah, grime – the one thing we are all trying to capture in texture painting
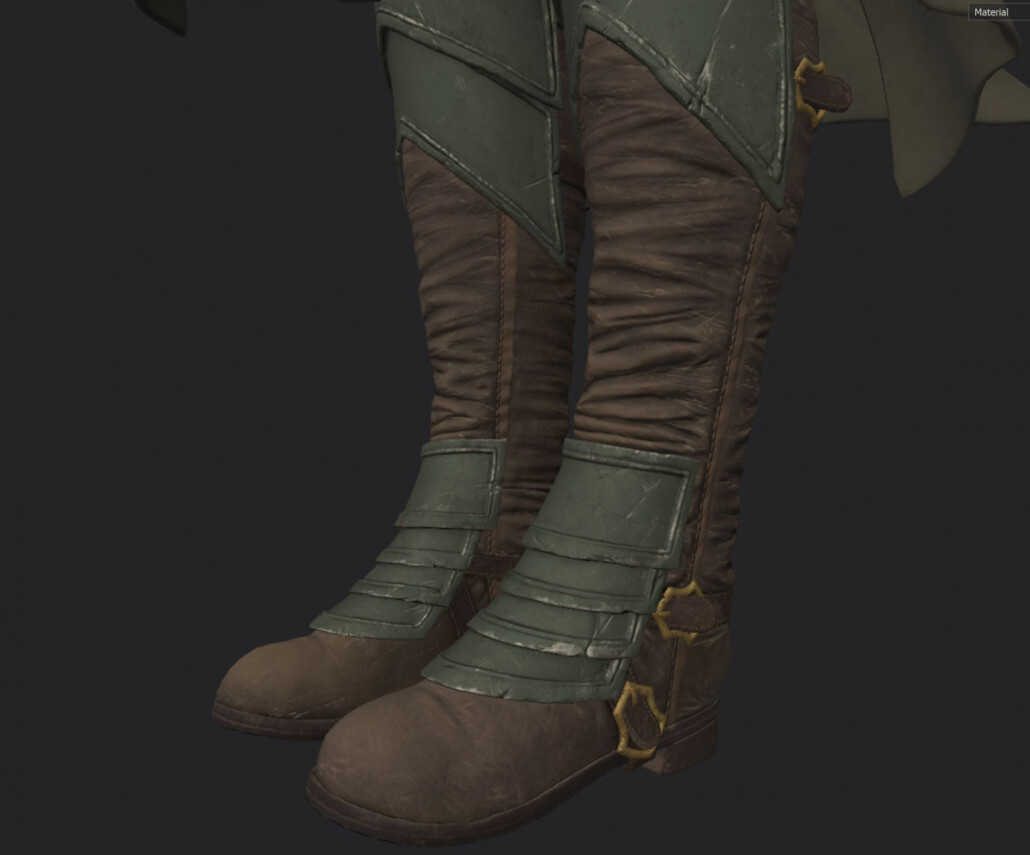
The armor proved to be a little tricky at first. In the concept art, it is a shiny green surface that is rather vague. I decided that it was steel painted green like the Green Knight from Arthurian lore. Over time this green paint would have been scratched, buffed and chipped away, especially on corners and edges, revealing the reflective metal beneath. Corroded brass buckles tied the green and brown aesthetic together nicely.
Another area that I really enjoyed was adding thread damage to the fabrics. I used the Anchor Point system in Substance Painter to mask in spots where I wanted damage to occur. I then dynamically adjusted the amount of threads that would appear in the damages areas with Anisotropic Noise patterns. So fun! I could tinker with this stuff for hours.
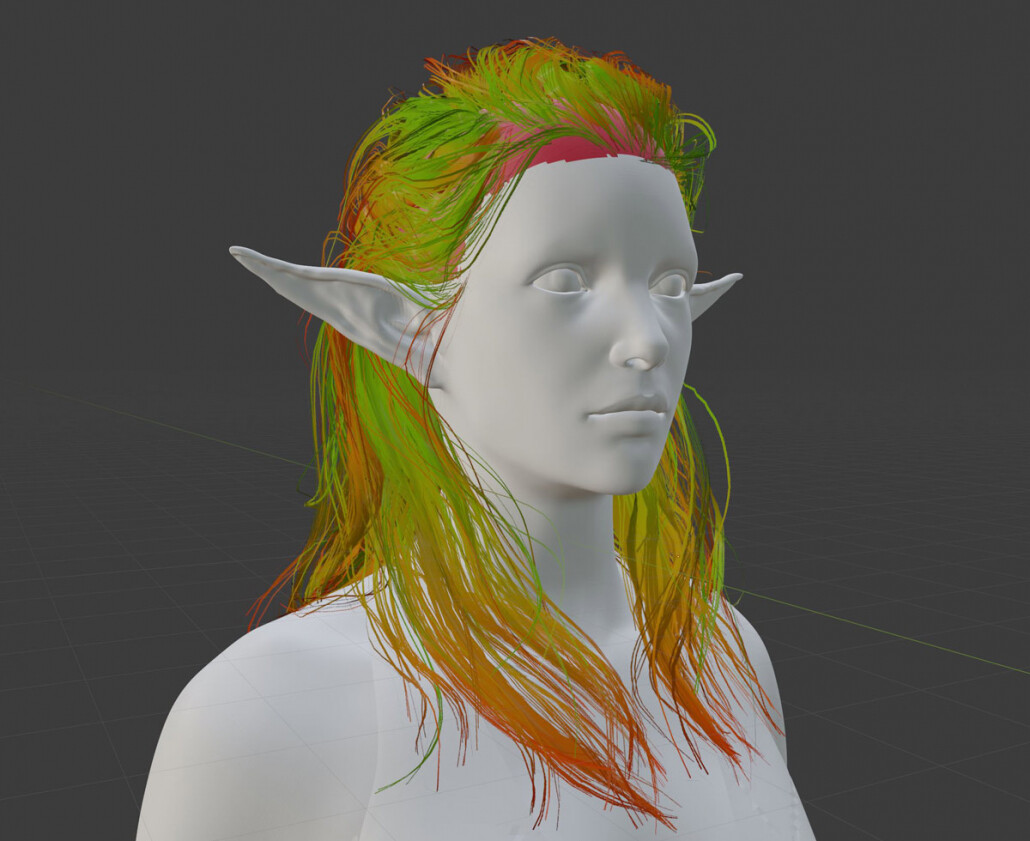
After texturing, I had one last demon to slay: hair. Hair is one of these topics where I feel I can prove to people that becoming a 3D artist is not really about talent. If there is talent involved, then it’s not that important. Not so long ago, I had zero capability when it came to creating real time hair or even how to get started. I have another blog post series about learning 3D where you can see the evidence: https://colinnitta.com/from-donuts-to-barbarians-my-year-of-3d-education-part-1/
Before I even began Nissa I knew I wanted her hair to be much better than my previous attempts. In my barbarian project Svörtsál, I spent two whole weeks struggling and failing to capture the hair and fur of the concept. It was so painful that I wanted to quit then and there. This is what I mean when I say there are no natural abilities at play here: only the stubborn refusal to quit.
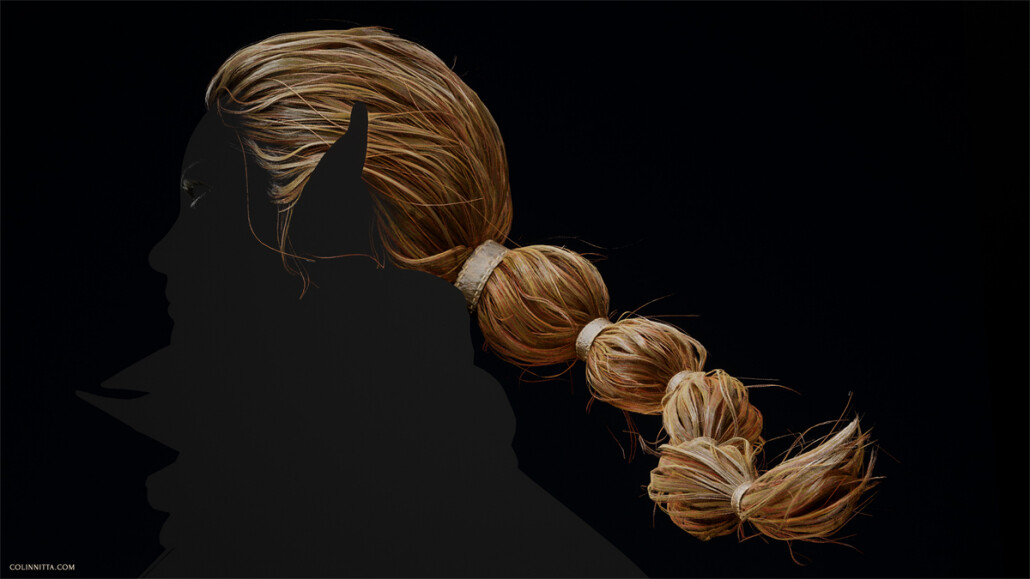
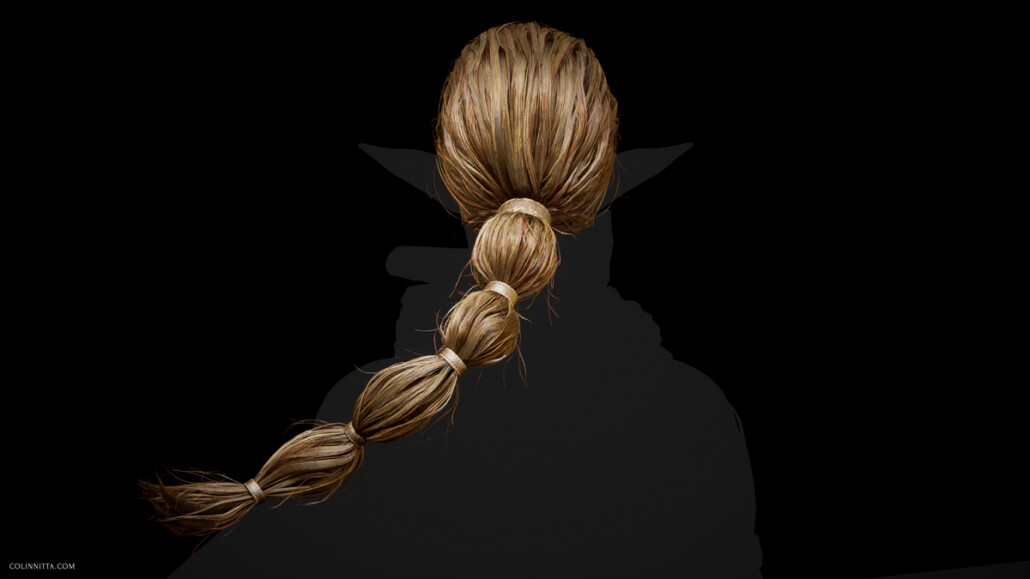
 Another look for Nissa’s hair. Developed by watching a video tutorial by Johan Lithvall, produced in conjunction with the Vertex School
In the early stages of modeling Nissa, I actually took a two week break to go through a hair tutorial by Johan Lithvall in order to level up my skills in this department. I originally thought it could be an alternate look for the character, or perhaps another project exploring hair. I went through the entire tutorial and learned a tremendous amount, following Johan’s project as closely as I could (including his specific hairstyle) to understand his workflow. He was using Maya and deformer modifiers to adjust the hair meshes, while I was using Blender and the plugin Hair Tool by Bartosz Styperek. Despite this difference, I was able to mimic his techniques very closely. I encountered some difficulties at the end in which Johan uses a very specific shader from Unreal that was out of date. I couldn’t find this darn shader anywhere! But, I felt like a learned a lot anyway and decided to come back to the shader problem when I did Nissa’s actual hair.
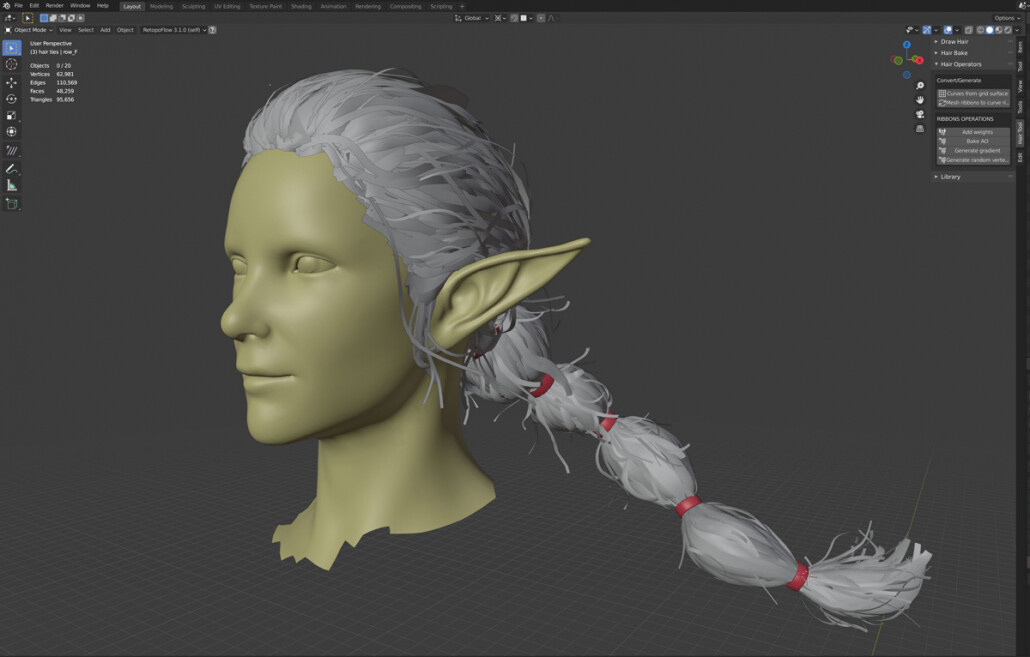
Because of this additional training, when it came time to do Nissa’s long flowing ponytail, I felt like I had laid enough technical groundwork to tackle it. Since my practice with the tutorial, I came up with a pretty good workflow for incorporating the Hair Tool plugin into a Johan Lithvall style workflow. Hair Tool is fantastic because it uses Blender’s curve system to build out the hair cards, which is extremely flexible. You can specify curve points that will perfectly bend the cards, as well as an XY resolution for each curve. It also has an awesome UV feature that allows for changing UV’s of hair cards on the fly, which I use constantly. Hair Tool does not do everything for me, though: there is always a final step in which I convert the curves to meshes and make tweaks, using Lattice Deforms to change the big shapes, going in and adding extra loops to specific curves, etc., but I find overall it saves me a ton of time and effort.
If you’re a Blender user like myself I highly recommend checking out the developer, Bartosz Styperek (AKA username JoseConseco). He has a Gumroad with several other really handy plugins as well as a Discord server with tons of good info.
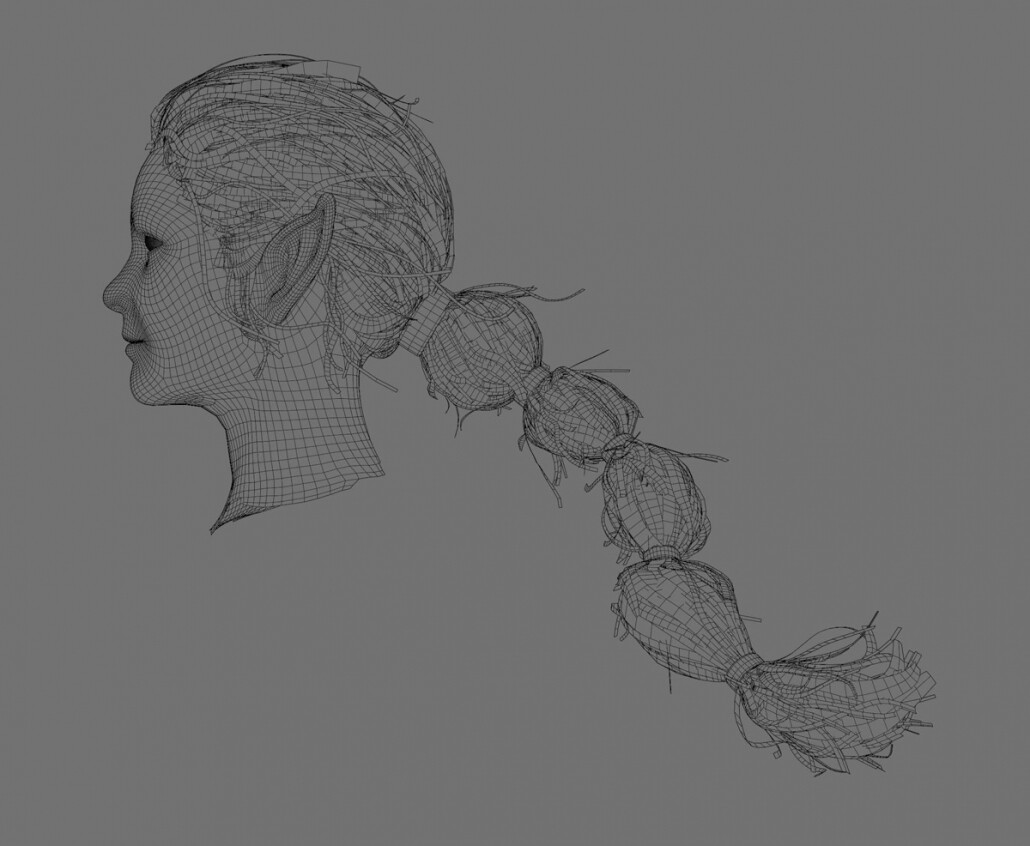
Covering all the details of how I built the hair would require another series of blog posts, which I am considering writing when I have the time. But in short, much experimentation and tinkering was required before I finally got the results I was looking for. Hair cards are so non-intuitive that in my opinion they are one of the weirdest challenges in character art. I have read many articles on the subject and every single one has wildly different strategies for the problem. Turns out, there’s no silver bullet: just the individual method that works to obtain the desired result.
Oh, and that hair shader problem I mentioned? Turns out the code for this shader was hiding in the Unreal Engine 4 content examples project, a thing I just didn’t know about. I looked in just about every other place trying to find it, but for some reason all the Unreal documentation I was reading up on was outdated and didn’t say it had been moved there.
After finally completing my hairstyle, I arrived at the very last stage: UE5. Taking on learning this massive game engine at the end of this project was intense. Adding to my challenge was that UE5 is still a developer release with bugs sprinkled throughout waiting to trip me up. Don’t get me wrong: it’s incredible to have access to this tool, free of charge. Praise be to the brilliant developers at Epic Games. But using a developer release is like test-driving a new vehicle at the bleeding edge: you don’t really know how it’s going to perform or what problems you’ll encounter.

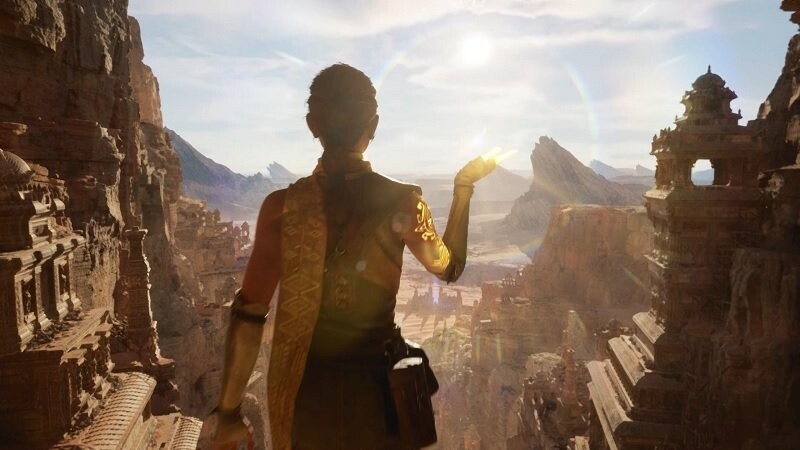
It was especially fun to browse the Quixel Megascan library and choose some lovely rocks, ferns and groundcover assets. My goal was to situate my character in an actual game environment – no photos or 2D backgrounds – so having these beautifully detailed, nanite enabled meshes ready to drop in was fantastic. There’s so much to play with here that I decided to only use some big mossy rocks for a backdrop and a scattering of ferns and groundcover for the base. I was feeling rather worn out by this point so I was happy to keep things simple, and in the end it was exactly what was needed.
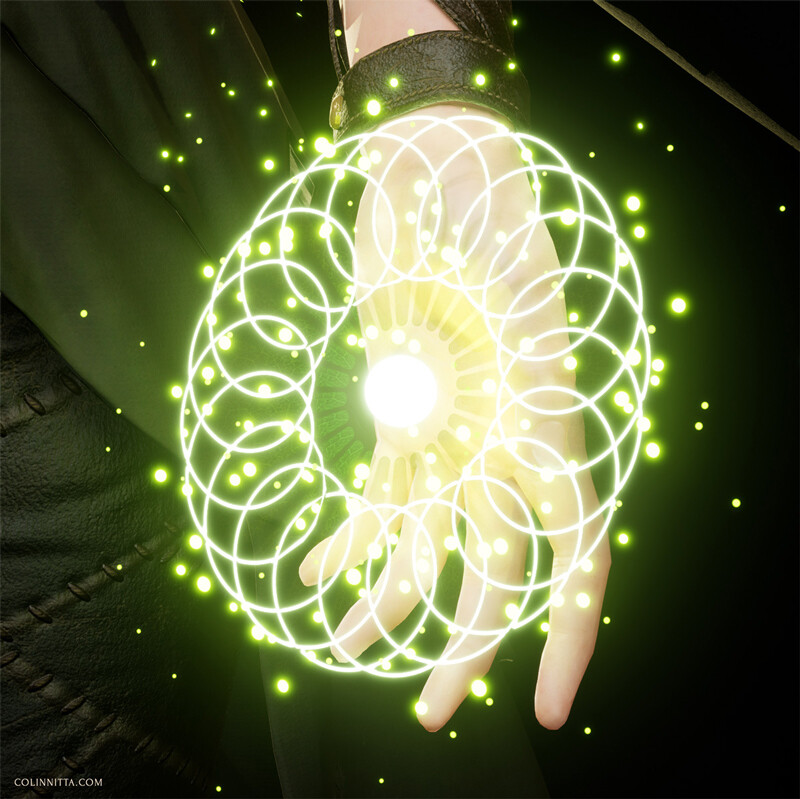
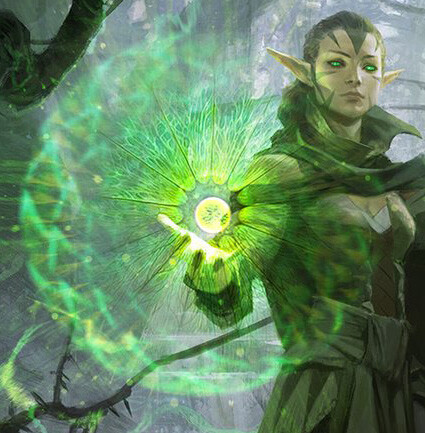
A final asset that I created was the magic effect in Nissa’s left hand. Wesley Burt’s illustration had this radiating spirograph pattern and I wanted to emulate it.
I could have just Photoshopped this into my render after the fact but that wouldn’t have been any fun. So, I decided I wanted to get this effect in 3D using emissive materials. To my relief, it actually wasn’t hard at all.
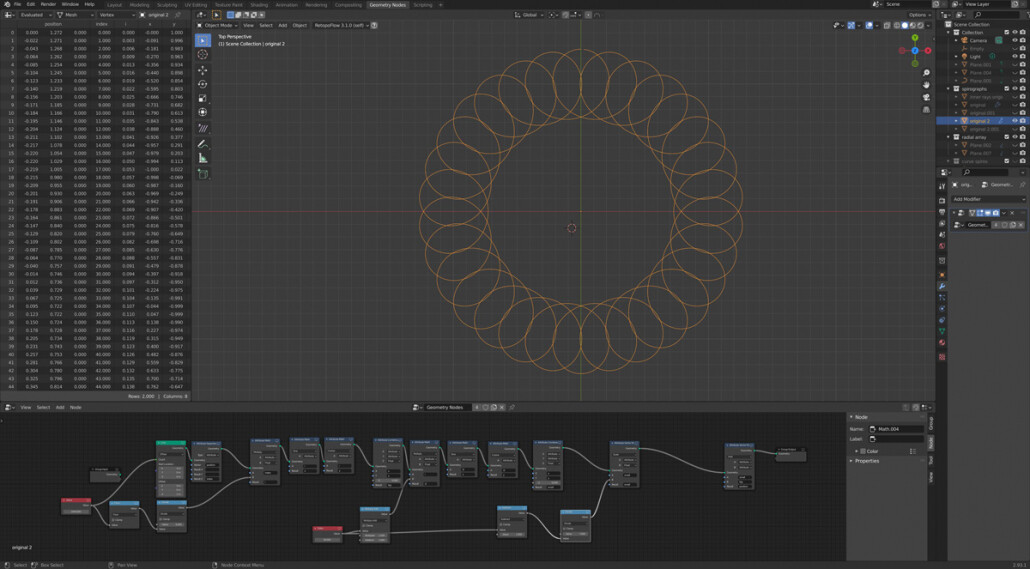
Key to the spirograph mesh was a tutorial I had come across by the artist Erindale that uses Blender’s geometry nodes to create a mathematical spirograph creator and this seemed like the perfect opportunity to put it into action. Just have to say it: Blender is so amazing, I love this program! I spent a little while tweaking the math and coming up with some really wild designs, layering them on top of each other to make some patterns straight out of Burning Man. But it was too much for a subtle effect and I didn’t want to distract from the character, so I ended up keeping my spirograph simple. I converted it into a card (which was actually the hardest part, but after some tinkering I figured it out), put a subtle leaf vein pattern on top, added some floating particles and called it good.
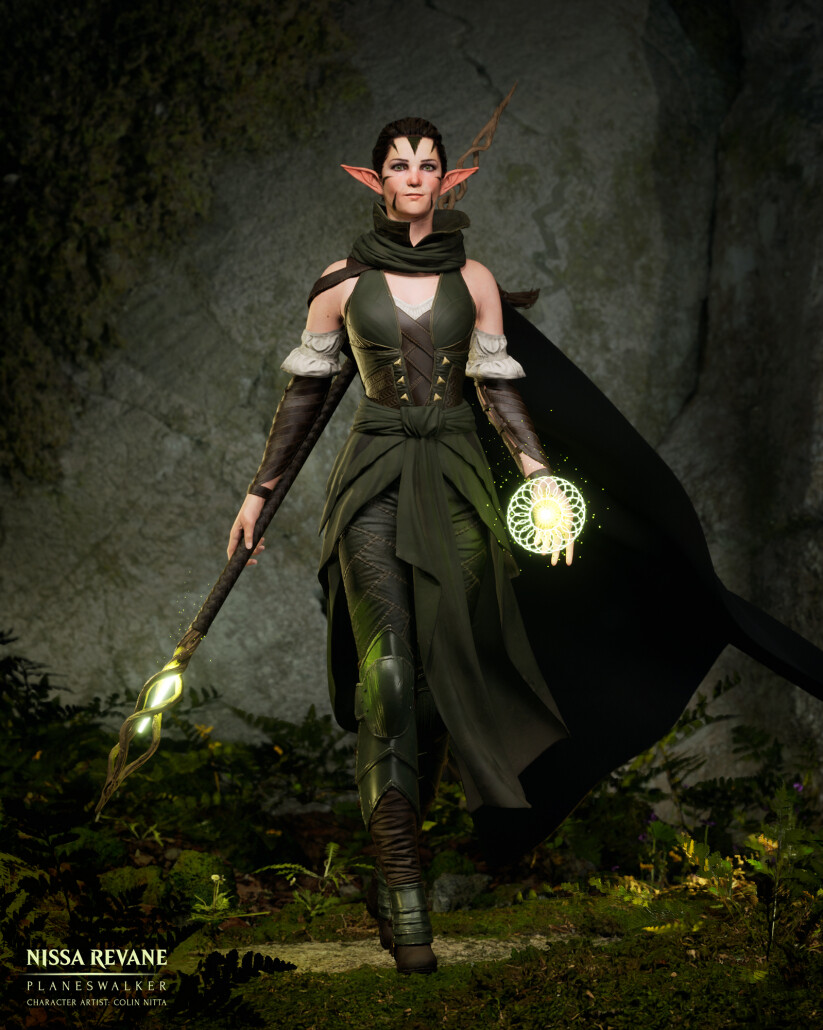
As far as lighting with lumen is concerned, there really wasn’t much to it other than turning it on and enjoying how well it worked. Lighting always takes a ton of time, there’s no real surefire way to speed up the process other than positioning and testing lights over and over until I get something I like. The process is much the same with lumen only that it feels easier. Completely automatic global illumination means that lights behave the way you’d expect and there’s not as much guesswork. I still struggle with a mountain of self doubt and anxiety at this stage – but not for technical reasons.
I have a feeling at the end of a big project that is a lot like an exercise regime I have. It’s very simple: running up a steep hill on a ridge behind my house four times in a row. After the first couple of laps, I start to get winded though I’m still keeping a good pace. But by the beginning of the fourth lap, the pain really starts to flare up in my thighs and calves. I’m not even looking at the top of the hill because when I do, it looks impossibly far away. All along, there is a sweet seductive voice gently advising me, “Stop, you’ve done enough. It’s okay…” I have to grit my teeth and push, ignoring the temptation to walk it off, go easy, take a breather. And by the time I finally reach the peak for the fourth time, my chest is heaving and sweat is pouring down my face, but the pain has almost completely vanished with only a vague soreness in its place. In fact, I have a hard time remembering this fleeting phantom sensation. And the seductive voice that went along with it.
Every stage of this model was like a lap up the hill. That fourth lap – it is killer. All artists deal with the fourth lap in one way or another. Just get through it! You’ll be happy you did.